.:A Little About Me:.

I'm a believer in Jesus Christ. A lover of my sweet husband Shaun. A mommy to my three kiddos Emerson, Atticus, and Sabriel. My friends and family tend to blur together. I *make stuff up* out of scrapbooks, altered items, and miniBOOKS that reflect these relationships.
Archives
July 2005August 2005
September 2005
October 2005
November 2005
December 2005
January 2006
February 2006
March 2006
April 2006
May 2006
June 2006
July 2006
August 2006
September 2006
October 2006
November 2006
December 2006
January 2007
February 2007
March 2007
April 2007
May 2007
June 2007
July 2007
August 2007
September 2007
October 2007
November 2007
December 2007
January 2008
February 2008
March 2008
April 2008
May 2008
Wednesday, May 21, 2008
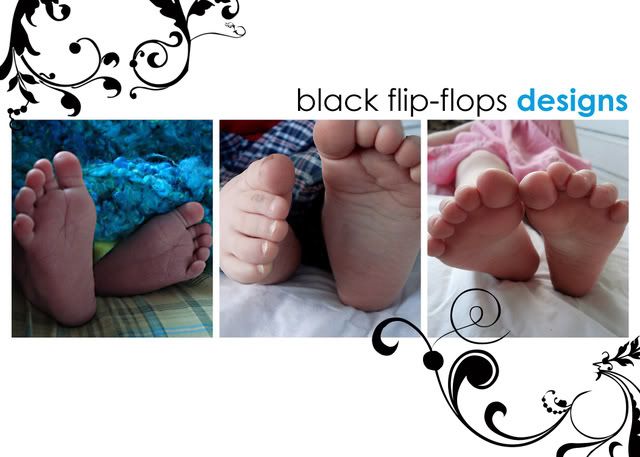
Photography Tips #1- Using Brushes in Photoshop

Today is going to be a really simple little lesson on how to use brushes in photoshop. It will probably look overwhelming, but I promise you- it's super easy. I use photoshop CS, and I don't really know anything about the other programs, but I imagine that these steps are probably similar in any version of PS.
Just a note: click on any of the photos below to view them at a bigger size. Also, next week I'll do screenshots instead of taking pics with my camera, like a big ol' doofus. ;)
Also, when following tutorials online, I've found it helpful to keep the tutorial open and photoshop open at the same time and just do one step at a time, by toggling back and forth.
To begin with, you'll need to download some brushes. You can find free ones here:
Photoshop Brushes
Brusheezy
The ones I'm using in this tutorial are:
Old Frame
Swirls
You'll need to download them somewhere easily accessible (I usually just download them to my desktop). Extract them if they are in a zip folder.
Then open photoshop.
The first thing you're going to do is open a photo. I do this by clicking on File>Open.
 Then you're going to click on your brush tool. It looks like a little paintbrush.
 A new little toolbar will come up on the top. Click the down arrow. We'll need to "load" the brushes you downloaded earlier, so this is how we start that process.
 This window will show up. As you can see, I already have some brushes loaded. It can get a little addicting. hehe
 Click on the arrow on the top right side of the box. I like to go ahead and set the viewing size of all my loaded brushes to "large thumbnails" so that I can easily see which ones I'm looking for.
Click on "load brushes". A new window will open, and you'll need to go find your brushes that you downloaded and extracted earlier. I keep mine on my desktop.
 Your new brushes will come up in your thumbnail gallery of brushes. I'm going to use a couple of brushes on this photo, so I'm going to begin with a vintage photo frame brush. I select the one I want (usually I look at a few of them to see which one I like the best):
If you move your mouse over on top of your picture, the brush will show up. You can see mine below is way too small. Sometimes it's way too big and it won't even show up.
 Whatever shall we do?!
It's as easy as pushing that slider back and forth to get it to the appropriate size. :)

That looks about right. Sometimes this takes a little playing around with.
 Place your brush over your photo wherever you would like it.
  At this point, I remembered I had my opacity set lower yesterday for something else I was working with, so I slid it up to 100% at the top of the screen.
To set the color of the brush, click over on the top of these two little squares:
 A new window will come up. This is your color spectrum. I'm going to pick black for my brush, so I just click on the bottom right corner of this window. If you wanted to pick another color, like pink for example, just click on those colors on the right to bring up those options.
Click your brush over your photo. Basically, you just "stamped" an image on top of your photo.

I want to get rid of the extra space around this photo (the excess part of the photo), so I'm going to crop it out. Click on the marquee tool on the top left part of the toolbar.
 Trace the dotty-square (technical term, y'all!) around the part of the image you want to keep.
Click Image>Crop

Ta da!

Now, this image looks fine, but I want to add a little something more.
And since I'm addicted to flourishes right now, it sounds like a good idea to add one.
Click on your brush tool again.

Select which brush you want to add. I like this little corner flourish thing.

Change the size of the brush again.

Move it to where you want it on the photo.

Click it to "stamp" it onto your photo and voila! You're done! Just save your photo now! :)

If you have any questions or better ways to do this, please leave 'em in the comments and I'll answer them on my next post. :)
What would you like a tutorial on for next week?
Labels: photography, photoshop
17 Comments:
Design Work


.:Blogs I Visit:.
- Scrap Etc. Inspiration Team
- Crop Addict Bloggers
- SEBC Friendlies
Scrap Etc. Bloggers
Join | List | Previous | Next | Random |Previous 5 | Next 5 | Skip Previous | Skip Next
thank you *so* much :)
Thanks for the tips!
thank you
thank you
i love when you use the brushes.
i don't have phote shop at home but we have it at work. i read about half way through your tips but i'm not at the computer that has photo shop so i will finish the post and then try it out.
One tip I would give is that when using the "Old Frames" the "Use Sample Size" was set so big that when I was clicking on my photo nothing was happening or at least I couldn't see it...but once I change the size then I could click and see results.
I figured it out when I used the "Swirl" and that worked straight away I saw results so then that made me re try the "Old Frame".
http://rondapalazzari.typepad.com/.shared/image.html?/photos/uncategorized/2008/05/19/zoo.jpg
Also, try to use a specialized software, or if you don't want to buy one, use your keyboard print screen insed of digital camera :)
You can find some nice brushes on the following websites also: Bitbox.com, Gfxfever.com, DesignFruit.com
Keep up the good work!